Monday, November 9, 2009

How To Market And Sell Your Digital Photographs:

Today I would like to share a quick tip, on one of the ways, I market and sell my digital photographs. It seems like digital photography has opened the door for anyone who has a desire to learn how to take high quality photographs. Learning photography is much easier than it has been in the past. New technology, especially in digital cameras and image editing software, has enabled anyone, with a strong desire to be a photographic artist, to achieve outstanding results. With this in mind we are seeing a multitude of people wanting to sell their best images, without any idea how to get started.

Marketing or selling anything requires a lot of work, and in most instances a substantial investment. That is where Red Bubble comes into play. I've recently found this fantastic website and started utilizing their service. Red Bubble is a great place to network with other photographers and artists. You can upload and sell your images on Red Bubble at no charge. Red Bubble gets a lot of traffic and this traffic could mean money in your pocket.But even more importantly you'll get feedback from other members, exposure to some fantastic art work and a ton of positive exposure.
A word of caution, be sure you only submit your best work. Red Bubble only accept hi quality, hi rez files, preferably around 50 or 60 meg files are prefered. So don't shoot yourself in the foot and upload just any old shot. Make sure it's your best work because other members will be viewing and commenting on your submissions. You don't want to be embarrased, so be selective.
This is just one of the many resources available for making money money selling your digital photos, but is definitely a great place to start. Remember there no out of pocket expense, and free is a very good price.

In addition to Red Bubble I've also found Turn Your Photos Into Cash a very good tool forselling your digital photos online.This is an excellent course and will also make your efforts much easier.
Oh, by the way, Red Bubble also provideds you with a wide selection of free sales tools to help you promote and market your images to the public. Below is an example of one of the sales widgets I am currently using to promote my Red Bubble site submissions.

Thursday, October 15, 2009

Free Photoshop Elements Training Ebook:

Photoshop vs. Elements:

If are not planning to use Photoshop professionally, or if you are new to the world of photo editing, the scaled down version of Photoshop, Photoshop Elements, may be just what you are looking for. Here the links for 2 free ebooks to see if Photoshop Elements is right for you. Download Inside Photoshop Elements volume #1 now. Download Inside Photoshop Elements volume #2 here.

Photoshop retails for over $500, while Elements can be found for a much more reasonable $99. Elements contains all the features necessary to remove speckling and damage from images, crop and rotate images, create professional looking graphics, and create attractive special effects in your photos. Elements also allows for the creation of artistic effects, color and lighting adjustment, and layer effects.

Unless you plan to regularly use custom printing separations and high-end color
management, the huge variety of professional options you pay for when purchasing the fullversion of Photoshop will go unused.

Photoshop Elements is much easier for the beginner to learn, as well. Please know that if
you have purchased Photoshop Elements and feel constrained by its limitations, it is an easy upgrade to the full version through the Adobe website.

If you have Elements, you’ll also notice some more really cool features like; Email, Burning to CD or DVD, and also a real plus is that the interface is less cluttered, which makes your life easier when you’re moving around the screen.

Quick Fix Guide Mode:

The quick mode enables you to make very basic alterations to your images as you can alter the following; Lighting, colour, sharpen, and you also have the options to do a smart fix.

Elements also gives you an auto fix button which can be found on the right hand side.
Another way to access the adjustments buttons is through the Enhance menu.

Auto fixing is a real help if you’re a complete novice at image editing and if you're after a
quick fix to your image. Here are six great short tools and features.

1 - Sometimes you’ll find your editing isn’t going the way it should be, so you can just hit
the "Reset Button" on the after picture.

2 - If you need to show your before and after images, there’s a drop down button in the
bottom left hand corner, which says "View".

3 - Your tool box can be found on the left hand side of the screen.

4 - You can zoom in from your image on this page and the zoom button can be found in the bottom left hand corner.

5 - Your auto tab buttons can be found on the right hand side of the screen.

6 - Each quick mode gives you the option of using sliders.

Full Edit Mode:

The full edit mode gives you everything you need to alter any of your images. You’ll find
that most of the tools and commands are found in the palettes.

The palettes are used for managing your layers and applying effects to your images. By
default the layers and effects palette are displayed automatically. If you wish you can also open more by choosing from the windows menu, which can be found at the top.

Another really cool feature for the palettes is they float, so you can have them where you like. Once you have brought your image up, you’ll find below the main image window your images that you have opened.

I hope this information has been helpful. Again, here are the links to the free ebooks to see if Photoshop Elements is right for you. Download Inside Photoshop Elements volume #1 now. Download Inside Photoshop Elements volume #2 here.

Tuesday, October 13, 2009

Photographing Fall Colors:


River-Reflections-1, originally uploaded by tday01.

It's that time of the year and it is time to start photographing the Fall colors. Fall colors are coming alive and changing rapidly. Here are a few tips for to help you get more vibrant colors in your Fall pictures.
1. Colors are always more vibrant when the leaves are wet. Don' t be afraid of getting a little damp if you want your photographs to have more saturated colors.

2. Have a tripod handy and use the middle to higher f stop range of your lens to get better depth of field in your photographs. This will require longer shutter speeds and the use of a tripod.

3. Early morning dew and fog will increase your chances of getting more mood in your photos.

4. Late afternoon and back-lighting can produce fantastic photographs and bright saturated colors.

5. Try slightly underexposing your images to increase the saturation of colors in your images.

6. Look for minute details. Macro shots or small clusters of leaves can produce some beautiful images. Don't get in a hurry and take the time to study the small details.

7. Look for reflections. Fall moisture can produce beautiful reflections in some unexpected areas. If there is a small puddle of water it may be reflecting the colors of the surrounding foliage.

8. Look in a full 360 circle. Sometimes your best shot may be right behind you.

Sometimes a quick change in the weather, heavy rain or strong winds, can cause your beautiful Fall leaves drop more quickly than you might expect. So don't procrastinate... Get out there and start shooting..

Monday, October 12, 2009

Moon Light Shadows

I just had to share this shot with you. I found this shot on Flickr and was amazed with the depth of color and contrast that was captured from this moonlight scene. This is a great example of making the most of, what I think to be, ordinary subject matter.

There has obviously been extensive post processing to capture the full tonal range that appears here. The maker of this image has put a lot of thought into what he was wanting to accomplish before taking the exposure.

Just a great example of making, and not just taking, a photograph.

If you are ready to take your photography to a higher level and would like to learn the secrets the pros use to get consistent results, stop by "Mastering Digital Photography Made Easy"

We've added some special limited time bonuses to our course, including a FREE CD of 21 video tutorials on PhotoShop Made Easy, that I think you will enjoy.

Till next time, Stay Focused...Terry

Wednesday, September 9, 2009

Eureka-Main-Street


Eureka-Main-Street, originally uploaded by tday01.

Hey, I thought I would share a quick HDR I shot a couple of weeks ago. Please let me know what you think by leaving a comment.

Thanks, Terry

Flickr

This is a test post from flickr, a fancy photo sharing thing.

Thursday, August 27, 2009

HDR Images of Lke Powell, Monument Valley, Mexican Hat

Thought you might like to view a few HDR Images of the Great Southwestern United States. I've been doing the majority of my posts at my Photography Lesson Center Blog . Here is a quick sampling of the Images I took while at Page Arizona and Lake Powell.


You can keep up to date with all of my future posts by subscribing to my RSS Feed at The Photography Lesson Center Blog.


Hope to see you there, Terry

Sunday, August 16, 2009

HDR Images: Badlands of South Dakota, Sturgis Bike Week

We’ve been on the road for 3 days and we’ve decided to take a previously ridden route from Cody Wyoming over the pass to Sheridan and then on to Sturgis. It is a great scenic route and I was looking forward to getting some nice digital images and maybe a few High Dynamic Range photographs. Little did we know that the route we were about to take was closed due to a rock slide over the pass.

What the hell is going on? We have had 100 degree heat, lightning, rain, freezing rain and it’s about to get worse. About an hour out of Cody we started to hit road construction and the next thing we new we came apon a road sign saying the road was closed one mile ahead do to a rock slide. Not that I’m a complainer but it would have been nice if they would have put the sign up 3 miles back at the junction, but what the heck, we just back tracked and headed to our alternate route, Worland Wyoming.

From Worland we headed over the pass and hit 20 more miles of road construction and one hell of a rain storm. The trip is starting to get interesting and one we’ll not soon forget. After all that’s why we do this, it’s all about the adventure. To our surprise, we made it through the day with all our body parts and bikes intact. We finally landed in Buffalo Wyoming to spend the night without touching my camera or taking a single image.
The next morning we had good weather and a relaxing ride into Spearfish South Dakota where we checked into our motel and headed to our favorite watering hole, the Full Throttle Saloon in Sturgis. It is only Wednesday and things don’t start happening until around Friday or Saturday so things were a little quiet and relaxing. I took a quick shot of the bar to document the trip. This place will have over 10 thousand bikers raising hell here in a couple of days, but we’ll have to miss the party because we’ll probably be in Colorado or Utah buy then.

OOPS! Blogger seems to be messing with meand won't let me upload more images. To continue reading please go to: Photography Lesson Center

Tuesday, August 11, 2009

Sturgis Bike Rally Trip, Shooting High Dynamic Range Photographs

Sturgis Bike Rally Trip, Shooting High Dynamic Range Photographs

Well day 2 of our our annual Sturgis Bike Trip was as expected. We blew through Idaho and made it to our second nights destination , Alpine Wyoming. Idaho was hotter than heck. The only time we stopped was for fuel and water. We were on the freeway all day and even at 75 to 85 mph the wind didn't cool us of much with the 100 plus degree temperatures. No photographs were taken, but we did cover about 500 miles.

Alpine Wyoming is about 40 miles south of Jackson Wyoming. Alpine is a great place to eat, drink, and a great place to start day three of our trip. We stopped on our way out of Jackson and I took a couple of quick shots, of the Grand Tetons, just to document the trip. Here is an example of the difference between a normally exposed file and an HDR (high dynamic range) photograph taken just prior to leaving the Tetons National Park.
Normal Exposure: Taken with average meter reading using aperture priority mode at f/16 and ISO @ 100. Shutter speed at 1/60 of a second.

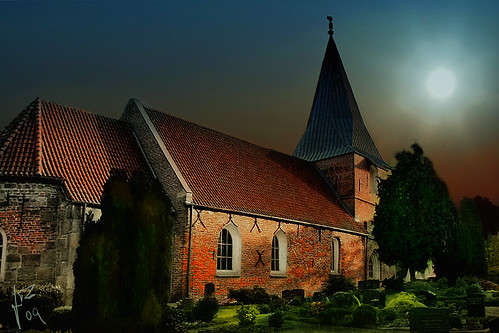
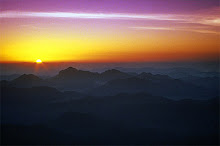
High Dynamic Range Photograph: The initial exposure was taken with the same exposure settings as the image above. Then an additional exposure was taken at plus 1 1/2 stops for increased detail in the shadow area. The third exposure was taken at a minus 1 1/2 stops to capture more details in the highlights. The three exposures were then blended together using Photoatix software. Here is the resulting image.

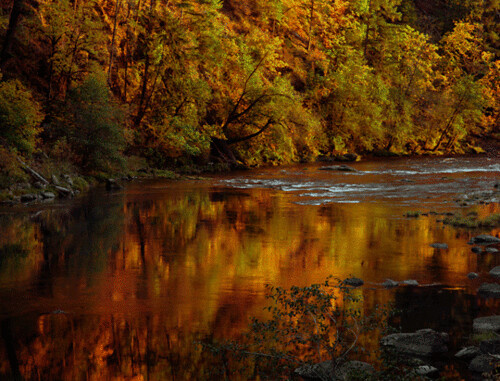
The weather began to take a turn for the worse as we crossed the mountains and headed towards Dubois Wyoming and the Wind River area. We did stop long enough to capture the following image before we hit the worst of the bad weather.
After I took these exposures we hit some pretty severe weather. You can see the clouds coming in from a massive cold front which came out of Canada. The rest of the day we rode through wind, lightning, and a lot of rain, on our way to our next scheduled stop, Cody Wyoming. We had planned to ride Bear Tooth Pass but it was closed due to snow that day! Bummer!
Normal Exposure: Taken with a Canon EOS 5D. Settings were at aperture priority at f/11 and a 60th of a second shutter speed. ISO was set @ 100
This High Dynamic Range Image was created with the same process as the proceeding HDR using Photomatix's HDR software and the detail image enhancement setting.

As you can see there is a strong weather front coming in from the north and we did get our butts soaked later in the day.

Stay tuned for our next installments of our, 15 day road trip to Sturgis, and other cool places to travel in the Great Western US.

By the way if you want to learn more about how to shoot digital photographs, or if you would like to give a nice gift to an aspiring photographer, check out my course on "Mastering Digital Photography Made Easy". You can pick up a free sample here.

Monday, August 10, 2009

HDR Digital Images of Sturgis Bike Trip 2009, First Day On The Road

Hey, I'm back from one heck of a ride. My riding buddy, Roger, and I were on the road for 15 days and it was quite an adventure this year. We experienced every kind of weather imaginal, including freezing rain, lightning storms, 50 to 60 mile an hour head and cross winds, a snow storm that closed Bear Tooth Pass,and a forest fire near Hat Creek in Northern California.

Our first day out was as we expected, fast and hard in 100 degree weather. We covered about 500 miles and didn't stop much to take photographs. I did however spot an interesting old home near Ontario Oregon and took the time to take a quick photo. Here is what I came up with. I titled this one, "Priorities". A guy has to do, what a guy has to do. Ride like a bandit and to hell with the house maintainance!

Here is the photograph taken with normal exposure settings:

I shot a series of three bracketed exposures of this image so I could do some experimenting with HDR. This image was taken in early afternoon and does have some challenging lighting, do to the extremes in contrast. Using "Photomatix" which is the software I use for creating High Dynamic Range photographs, I created the next image using the exposure blending mode. The 3 exposures were bracketed at: 2 stops over exposed to capture detail in the shadows: 2 stops underexposed to capture detail in the highlights: and a normal exposure for the mid range tones.

No additional color or density corrections have been done but the shadow and highlight details are much improved over the original single exposure and I now have a file with a wider range of detail in both the shadows and the highlights. Further tone and density corrections will be much easier to do with this image than if it were made from a single exposure.


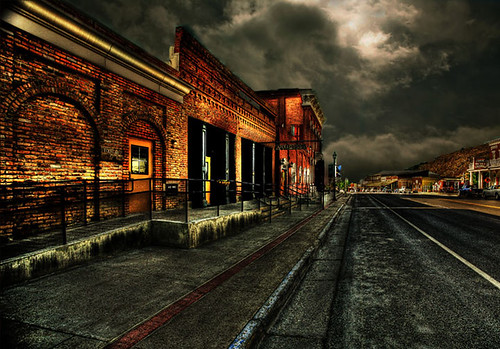
Now for the fun part! Next I took the same 3 images that were used in Photomatix's exposure blending mode and used the image detail enhancer to create the following image. Like it or love it, I think you will admit, It is interesting, and does get your attention. The interesting part of using the image detail enhancer is, you have a larger amount of creative control. You can create images with beautiful detail in both the highlight and shadows, or you can opt to create a funky effect like the image below using a variety of slider options.

After all, photography is suppose to be fun! HDR is just another way of having a good time as well as a means to getting some nice digital photographs that might otherwise not take. HDR enables you to shoot in extreme or crappy lighting and still produce a high quality image. Oh, and by the way, you don't need to shoot HDR in raw because HDR software is going to convert your files to jpegs or tiffs anyway.
Stay tuned for more images, and a day by day account, of our 2009 Sturgis trip in the weeks to come.
Till next time, stay focused, Terry


Friday, July 24, 2009

7 Tips For Taking Razor Sharp Photographs


You should always strive for the sharpest photographs possible. You can always soften or add blur to your photographs later in the digital darkroom. It is almost impossible to recover sharpness if your original images are not sharp to start with.


Here are seven tips that will help you take sharper photographs every time:


1. Always use a tripod when possible
I know tripods are heavy, they take a long time to setup, and they can be expensive, but it’s nearly impossible to get sharp photographs without one when shooting in lower lighting situations. Any photograph with a deeper depth of field requires an f stop of f/11 to f/22. These f stops require longer exposure times. A good rule of thumb is always use a tripod when your shutter speed is equal or longer than the focal length of the lens you are using.


2. Enable your mirror lockupNormally, the mirror in your Digital SLR will flip up immediately before the shutter opens, and this can cause your camera to vibrate a little. By locking your mirror up prior to your exposure you will avoid any camera shake or vibration.
Enabling mirror-lockup will add a significant pause between the time the mirror goes up and the shutter opens, letting any vibration die down before the photo is actually taken. Look in your camera’s manual to find out how to enable this feature.


3. Use a remote shutter release to avoid camera shake
The less you touch your camera, the less it will shake. When you press the shutter button on your camera to take a photo, there’s a good chance you’ll shake the camera a little.To prevent this, use a remote control to release the shutter, or you can just use the timer on your camera. I recommend a bulb type, air release, or an electronic remote shutter release. Cable style releases will work if you press them gently.


4. Use the fastest shutter speed possibleWhen you increase your shutter speed, you leave the shutter open for a shorter length of time, so there’s less time available for the camera to shake. I usually like to underexpose just a little to get good saturation and to ensure I capture all the highlights.


5. Use manual focus whenever possibleAutofocus is great for moving subjects or when you need to take photos quickly, but when your subject is stationary, for example a landscape or pictorial you should always try to use manual focus. This ensures you’re focusing on the right subject, at the proper distance.


For macro photography, manual focus is the only way to get sharp photos. Autofocus just doesn’t work very well at closer distances.


6. Shoot a lot of photographs
When shooting wildlife or any kind of fast moving subject, the best way to get a super sharp photo is to take as many photographs as possible.


Digital exposures are free. There are no film costs involved. So take advantage of digital film, and shoot as many exposures as necessary to get the results you are looking for.


7. Use the sweet spot of your lens
Most lenses are sharpest in their middle ranges. For example, if your 28 to 100 mm zoom lens has a speed of f/4.5, then you’ll probably get the sharpest results from using f/8 to f/11 and zoomed at 55 to 65 mm. Very rarely are lenses as sharp on their fringe or outer area. Also, a fixed focal length lens will always sharper than any zoom lens.


Get more tips and a FREE sample of "Mastering Digital Photography Made Easy" and you'll be using that digital camera like a pro in no time.

Monday, July 20, 2009

How To Avoid AutofocusProblems With Your Digital Camera:

Autofocus can be a lifesaver at times, especially when things are happening very quickly. But sometimes autofocus can be very annoying. For some shots it will focus on the right part of your subject, but then the very next shot it may choose to focus on everything but what you would like it to. It may focus on something far and away into the background or a subject very close to you like a persons shoulder who is standing in a profile pose, causing their head to be out of focus. This often happens at weddings, when a bride is holding her bouquet in front of her, and you end up with her facial features blurry and out of focus but the bouquet looks great.
Sure, you could avoid this problem by always using manual focus, and you should use manual focus whenever possible but, there are other simple solutions to the problem.

Now there are two ways to lock your focus and prevent your camera from autofocusing on the wrong part of your subject:

1. Set your autofocus point to the center spot, then point this spot at your subject or at a specific spot in your scene if you are taking a pictorial photograph. Then press your shutter button half-way down. Do not press it completely down yet. Then, while still holding your shutter button half-way, recompose your shot and press the button completely down, and take your photograph.

2. A second method which is good for pictorial photographs is to autofocus as you normally do, but once your camera focuses on the right spot, just switch off autofocus on your lens, changing to manual focus. Your lens will keep the current focus when you do this. Now you can take your photograph and your focusing point will stay fixed.

Having your autofocus chase, or move back and forth, can be very annoying. This can cause you to become frustrated and miss some potentially great shots. But if your eyesight is less than perfect, like mine, these tricks will improve your success rate once you work with them a little.

Stay tuned for more quick tips,
Till next time stay focused, Terry

Wednesday, July 15, 2009

New HDR Images From Graffiti Weekend


Hey, I thought....you might enjoy a look at a couple of the cool cars that were showing on Graffiti weekend in Roseburg last weekend. I played arround with HDR and did a couple of quickies.


As I have more time I will be posting some more HDR images and a look at some of the great cars that were there.


I'll be busting out to Sturgis on our annual bike trip for a couple of weeks real soon. I will be posting some shots of some of the crazy's we always encounter there. It's going to be a great trip as always. We will be covering about 5500 to 6000 miles in 12 to 14 days. That's going to be 10 western states with a bunch of photo oportunities. I'm already excited about shooting some HDR and having a lot of fun.

Til next time, stay focused...Terry


Thursday, July 9, 2009

How To Photograph Sihlouettes


How to Photograph Silhouettes. Normally we talk about the importance of using a flash when taking shots into the sun to give sufficient light to add features to your subject but there are also times when making your subject featureless apart from their outline against a bright background can be most effective - or when the sun is setting and you want your forground images to be sihlouetted.

Silhouettes are a wonderful way to convey drama, mystery, emotion and mood to the viewers of your photos and often stand out in an album because of the combination of their simplicity but also the story that they convey. I love them because they don’t give the viewer of a clear picture of everything but leave part of the image up to their imagination to wonder about.


The basic strategy you’ll need to employ in taking silhouette shots is to place your subject (the shape you want to be blacked out) in front of some source of light and to force your camera to set its exposure based upon the brightest part of your picture (the background) and not the subject of your image.


In doing this your subject will be under exposed (and very dark, if not black).
There are a lot of very technical descriptions going around on how to take great silhouette shots that you might want to look up but let me attempt to run through some basic steps that should get you the results you’re after. In essence what we’re trying to do is make your camera think that it’s the bright parts of the picture you are most interested in.


Here’s how to do it:


1. Choose a Strong Subject
Almost any object can be made into a silhouette, however some are better than others. Choose something with a strong and recognizable shape that will be interesting enough in its two dimensional form to hold the interest of those viewing your image. Silhouettes can’t draw on the colors, textures and tones of subjects to make them appealing - so the shape needs to be distinct.


2. Turn off your Flash
If you have your camera in automatic mode your camera will probably want to use its flash which will ruin the silhouette. Basically you want as little light on the front of your subject as possible - so the flash has to go (basic - but I’ve seen a few attempted silhouette shots with the flash firing).


3. Get Your Light Right
When it comes to lighting your subject you’ll need to throw out a lot of what you’ve learned about normal photography and think a little backwards. Instead of lighting the front of your subject, in silhouettes you need to ensure that there is more light shining from the background than the foreground of your shot - or to put it another way - you want to light the back of your subject rather than the front. The perfect light for this is placing your subject in front of a sunset or sunrise - but really any bright light will be able to do the trick.


4. Frame your image
Frame your shot so you are shooting with your subject in front of a nice plain, but bright background. Usually the best backgrounds will be a bright cloudless sky with the sun setting. You want to position the brightest light source behind your subject (either so that they hide it or so that its in the background somewhere).


5. Make silhouetted shapes distinct and uncluttered
If there is more than one shape or object in the image that you’re attempting to silhouette, try to keep them separated. ie if you are silhouetting a tree and a person don’t have the person stand in front of the tree or even leaning on it as it will merge them into one shape and as a result your viewers could be confused about what the shape is.


Also when framing you’ll probably want to photograph silhouetted people as profiles rather than looking straight on. This means that more of their features (nose, mouth, eyes) are outlined and they are more likely to be recognized.

6. In Auto Mode
Most modern digital cameras have automatic metering which are pretty good at sensing how to expose a photograph so that everything is well lit. The problem with this is that most cameras are so smart that they will light up your subject instead of underexposing it to get a silhouette so you need to trick it. Most cameras work out the exposure levels in auto mode when you push your shutter half way down (at the same time that they focus). So point your camera at the brightest part of your picture and then press the shutter halfway down (don’t let go). Then move your camera back to frame your shot with the subject where you want it and then finish taking the shot. With most digital cameras this will result in a silhouetted subject. In effect what you’re doing is tricking your camera into thinking that the bright part of the image is the mid tone of it so that anything darker than it will be exposed as a nice dark shadow.


Some digital cameras also have ’spot’ or ‘centered’ metering modes that you can switch on which helps with the above technique as they will set the metering on the central spot of your frame rather than multiple spots. This means you can accurately tell your camera exactly which bit of the bright background you want it to set the exposure on.

7. Manual Mode
If this technique doesn’t work and your camera has controls to allow manual exposure or exposure compensation you might like to try some of your own settings. The beauty of digital is that you can experiment to your hearts content until you get the result you’re after.
A simple way to start using manual mode is to look at the shutter speed and aperture that it suggests in automatic mode and to start from there. If in auto mode your subject is too light (ie you need to make it darker) stop down the shutter speed a stop or two and see what impact that has. Use the ‘bracketing’ technique that I described in my previous post on photographing sunsets to get a variety of shots at slightly different exposures.


8. Focusing
In most cases you’ll want the subject which is silhouetted to be the thing that is in focus most crisply. This can mean that the process described in point 4 can be a little tricky as pushing your shutter half way down to get the metering right also means that you’ll focus on that spot in the background. To get around this you can use two strategies. Firstly if your camera has manual focusing you might want to try that. Pre focus your shot before you meter your shot.


The other strategy is to use Aperture to maximize your depth of field (the amount of your image that is in focus). Set a small aperture (ie a larger number) to increase the depth of field - this means you’re more likely to have a sharper foreground and background in your shots.


One last tip on Silhouettes - while a total silhouette with a nice crisp and black subject can be a powerful shot, also consider the partial silhouette where some detail of your subject is left. Sometimes a touch of light on them makes them slightly more three dimensional and ‘real’. This is the beauty of bracketing your shots as it will leave you with total and partial silhouettes to choose form.

Til next time..stay focused, Terry

How To Take Stunning Sunrises And Sunsets


Tips for Photographing Stunning Sunrises and Sunsets


Think Ahead - While sometimes wonderful sunrise and sunset shots can be taken spontaneously without any forethought it’s often the case that the best ones come out of planning. Scope out places that might be good for sunsets in the day or two before your shoot. Look for interesting places where you might not only be able to see the sun track all the way down but where there will be opportunities for shots that include foreground elements and silhouettes. Sunsets only take half an hour or so so you want to think about these elements before they start or you might miss the shots you’re after.


Find out when the sun will set or rise and get there at least half an hour before hand as it’s often in the lead up to and the time after the sun appears or disappears that the real magic happens.
Keep an eye on the weather also. There are a variety of different types of sunsets that produce a range of different types of lights and patterns in the sky. Don’t just go for clear days for these shots - while they can produce some wonderful colors it’s usually the times where there is cloud around that the real action happens! Also be aware of days when there is dust or smoke in the air as they can produce amazing results also.


Consider ahead of time what equipment you might need. Include a tripod, lenses that will give you a range of focal lengths, extra batteries etc.


Shoot at a variety of focal lengths - wide angle can create sweeping landscape shots but if you want the sun itself to be a feature of the shot you’ll want to be able to zoom right in.
Keep in mind that the sun is just half a degree across so when you shoot with a wide lens it will only be taking up a reasonably small part of the photo. If you want it to be a feature of your shot you’ll need to zoom in on it using anything from a 200mm lens upwards. This will increase your need for a tripod!


Also be aware that when you look at the sun at the best of times it can be dangerous but when you look through a magnifying lens it can be quite dangerous is the sun is still too high in the sky.
Silhouettes as focal points

As with all photos, sunsets need a point of interest and one of the best ways to add one to a picture is to try to incorporate some sort of Silhouette into the shot. This could be something large like a mountain range, something that is part of the environment like a palm tree or a pier or could even be a person.


The great things about Silhouettes is that they add mood and context to a sunset or sunrise shot. I’ll write more on silhouettes in a future article.


Rule of thirds - Remember the rule of thirds in your photographing of sunrises and sunsets. While you can always break the rule it’s often a good idea to place elements like the horizon, sun, silhouettes etc off centre.


Exposure Techniques
Shoot at a variety of exposures - if you let your camera decide what shutter length to shoot at you’re likely to get a shot that doesn’t really capture the beauty of the light. Quite often the shot will be under exposed because the sky is still reasonably light.


Instead of relying upon the camera’s auto mode a sunset is an ideal time to switch your camera into aperture or shutter priority mode and to take a variety of shots at different exposures.
The great thing about sunsets and sunrises is that there is no one ‘right’ exposure and that you can get stunning results using a variety of them. Also keep in mind that different exposures (aperture and shutter speeds) will produce a variety of different results so it’s worth taking more than just a few shots - the key is to experiment.


I usually use aperture priority mode and use a tripod . Working with smaller apertures gives me a deeper depth of field but also requires a lengthy exposure time.

Bracketing - Another technique to try to get the right exposure is ‘bracketing’ where you look at what the camera suggests you take the picture at and then take a few shots at both under and over that mark. ie if your camera says to shoot at 1/60th of a second at f/8 you would shoot off a shot at 1/60 at f/5.6 and then at f/11. In doing so you end up with a series of shots at different exposures which will all give you slightly different results and colors. Most DSLR’s and some point and shoot digital cameras have a built in bracketing feature so you don’t need to do this manually - learn how to use it!


Auto Exposure Lock - Another exposure trick, if you don’t have a bracketing mode or don’t feel confident in using it is if your camera has ‘auto exposure lock’ which allows you to point your camera at a darker place and lock in exposure for that spot (ie you could point it at the ground in front of you and lock in that exposure) and then re-frame the picture looking at the sunset. This will mean you get a more over exposed shot.


Take camera out of Auto White balance mode - when you set your camera to ‘Auto’ in it’s white balance mode you run the risk of losing some of the warm golden tones of a sunrise or sunset. Instead try shooting in ‘cloudy’ or ’shade’ which are usually used in cooler lights and tell your camera to warm things up a little. Alternatively - if you’re shooting a sunrise and DO want a cooler moody shot you can experiment with other white balance settings.


Other Sunset and Sunrise Tips
Tripod - If you’re shooting at longer shutters speeds and with longer focal lengths then a tripod or some other way of ensuring your camera is completely still is essential.

Manual Focus - sometimes when shooting in extreme lighting conditions some cameras can have trouble focusing. If this is the case for your camera consider switching to manual focus to ensure you get nice crisp shots.


Look around you - The wonderful thing about sunsets is that they not only create wonderful colors in the sky in front of you but they also can cast a beautiful golden light that is wonderful for other types of photography. As the sunset progresses keep an eye on other opportunities for shots around you (not just in front of you). You might find a great opportunity for a portrait, landscape shot, macro shot etc behind you in the golden light.


Keep Shooting - A sunset or sunrise constantly changes over time and can produce great colors well after the sun goes down or appears so keep shooting at different exposures and focal lengths as I’ve mentioned above until you’re sure it’s all over.


Stay tuned for our next installment, Shooting Sihlouettes

Free Sample Lessons From Mastering Digital Photography

Hi everyone, I'd like to announce the release of my new digital photography course "Mastering Digital Photography Made Easy". You can get a quick look inside a view a few sample chapters by going to How To Shoot Digital Photos. There is a link on the site where you can sign up for some free photo tips and download the sample PDF.

I'll be posting here regularly with tips and information on all aspects of the photography industry. I invite you to make comments and submit any articles or photographs you wish. I'd like to see this blog be somewhat of an open forum, so I invite your input. Just post a comment and I'll review it and publish it as quickly as humanly possible.

Check back regularly and please subscribe. We should all have a good time here.
Till next time... Good Health, Terry